Reset or Flush DNS Cache in your Mac, Windows or Ubuntu Linux operating system easily. If you are seeing your website resolving to your old web hosting, IP address or changes you have made to /etc/hosts file not getting effect, then try this tutorial to Flush DNS Cache instantly.
DNS Cache stores the IP Addresses of Web Servers that contain web pages. Whenever you type a URL in your web browser, DNS is like a phone book and it plays an important role in translating the domain name to IP address. If your webmaster or server administrator made any changes to DNS Servers (Nameservers) of your website domain name, then DNS Cache may require manual Reset,Clear or Flush to resolve to new IP Address.

For an example, if you have migrated your website to a new web hosting, created new sub domain and not able to access it from your computer, website showing suspended notice even after your webmaster unsuspend it, then Flush DNS Cache to stop receiving old cached versions of your website.
There are several other reasons which require you to Flush DNS Cache. Alright, without any further delay, lets jump in to see the quick steps you have to do, to clear or flush dns cache in your Mac, Windows or Linux PC.
Tip: You can verify the DNS Propagation status by visiting Whatsmydns.net and entering your website address. Select the Record (A, NS, CNAME etc) to get specific results.
Also Read, How to use Google DNS in Mac, Ubuntu, Windows or Router?
Flush DNS Cache in Mac OS Mojave
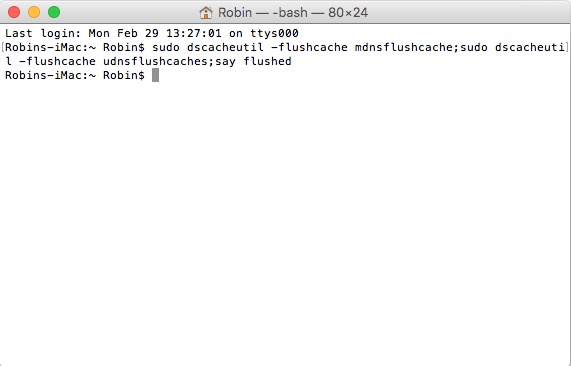
To Reset Cache, Launch Terminal App (/Applications/Utilities/Terminal.app) or enter “Terminal” in Spotlight Search. Both UDNS (Unicast DNS) and MDNS (Multicast DNS) should be flushed with -killall command.
Let’s start with Mac OS . this command should work well from Mac OS El Capitan till mac OS Mojave.
As you can see in the following picture, when you enter the above command in your Terminal and if you have your Speakers turned ON, you will hear a voice saying “Cache Flushed“. That happens as we have the command “Say” at the end of cache flush command. Once done, it will take you back to the same directory path and you may now close this terminal application.

If there is any error in the command, then you will see the error details in your terminal window.
Flush UDNS and MDNS Cache in OS X El Capitan
Discoveryutil command works up to OS X Yosemite and with OS X El Capitan, Dscache takes control of the DNS Cache system and it is simple yet more flexible than discoveryutil command. If you want to specifically flush UDNS and MDNS Cache in your El Capitan, use the following command in Terminal.
This will reset all the cache data and you should be able to access the latest modified version of your website or server data instantly or within few minutes.
Also Read, Best Spy Apps for Android Devices you can Download
Flush DNS Cache in Windows 10
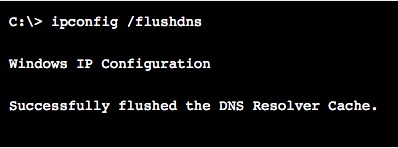
To Flush DNS Cache in Windows 10, hold Windows Key and press “R” to launch “Windows Run” dialog box. Now type “ipconfig /flushdns” and press “Enter” or Click “OK” to execute the command. Congratulations! You have successfully Flushed DNS Cache in Windows 10.
Microsoft Windows 10 is more powerful with tons of new features added in Networking and other system core functioning methods. It is an excellent mashup of Windows 7 and Windows 8, that is friendly and more stable than ever before. Most of the Windows Run commands are same as its earlier versions with added parameters that brings new features to play.
If you have used Windows XP, Windows 7, 8 and other versions of Windows, you should know what i am talking about.
System Compatibility: Windows XP/2000/7/8 and Windows 10.
Also Read, Best VPN Software for Windows, Mac and Mobile Devices
Flush DNS Cache in Ubuntu
When it comes to Terminal commands, Ubuntu is my favorite. There are so much GUI changes across the operating system recently, but terminal is my favorite place always.
Reset or Flush DNS cache with dns-clean command in Ubuntu Terminal window. Launch the Terminal and enter the following command to instantly flush dns to resolve any domain names latest IP address or changes you have made to your /etc/hosts file come into effect.
This should work very well on Ubuntu 14.04 LTS and Ubuntu 15.10 installs. If you are using Ubuntu 13.04 and earlier versions you may use the following commands as well to specifically reset, flush NSCD DNS Cache and flush DNSMASQ DNS Cache as well.
Launch Terminal and Enter the following command to Reset DNS Settings.
To Reset or Flush NSCD DNS Cache,
To Reset or Flush DNSMASQ DNS Cache,
We hope this article has solved your DNS Cache problem and you are able to see the latest, modified version of your website or your website moved to a new web hosting server. If you find this tutorial useful, feel free to share this post with your friends and followers.
Reset, Clear or Flush DNS Cache in Mac OS X El Capitan, OS X Yosemite or earlier versions, Windows 10 or earlier versions, Ubuntu 15.10, 14.04 or earlier versions easily in few seconds.
If you are getting any errors, feel free to comment below and we will be happy to fix them and make the necessary changes to this post as well. Have a wonderful day.


I didn’t know Linux had cache on DNS lookup ..
Hello!
sudo /etc/init.d/dns-clean restart
doesn’t work in my 16.04 Mate (command not found)
Install it using: sudo apt-get install dns-clean
On 16.04: deployer@host:~$ sudo apt-get install dns-clean
Reading package lists… Done
Building dependency tree
Reading state information… Done
E: Unable to locate package dns-clean