I tried to setup a webmail account on my iPhone 6 Plus running iOS 8.1.1 by following the simple tutorial guide suggested by Hostgator. Its for a website hosted with hostgator and i had a problem while configuring the setup instructions as suggested by them. After entering the hostname field, it wasnt working as mentioned in the tutorial and i found a way to make it work after few minutes. So thought to write about it with a quick video tutorial to help you setup webmail on iPhone.
This tutorial will also work on iPad and iPod Touch. If you need any assistance after trying out this webmail setup tutorial, feel free to ask me in the comment section.
The instructions provided at hostgator website may be working for iOS 7 or earlier, but it didnt work in iOS 8.1.1 on my iPhone 6 Plus. You can follow the steps below on any hosted email environment. If you are website is hosted with InMotion Hosting, Godaddy, Bluehost or any other third party hosting providers, this tutorial must help you to setup email on your iPhone.
If you want to setup Gmail on iPhone running iOS 8, the steps are pretty easy. Also for any popular email services and microsoft exchange configuration, we have default templates ready to use at “Settings – Mail, Contacts” section on iOS. Alright lets move on to steps to successfully configure email on iOS 8 running iPhone.
Setup Webmail on iPhone Running iOS 8
Webmail configuration is not easy all the time and with Hostgator hosted website, configuring webmail took me some extra steps that i found after little workaround. Here are the steps that will help you to setup webmail on your iPhone. Watch the following video to know the instructions. Also adding step by step text details for you as an alternative.
[youtube]https://www.youtube.com/watch?v=V6fWzHkumYI[/youtube]
Step 1: Go to “Settings – Mail, Contacts, Calendars” and tap on “Add Account” under Accounts section.

Step 2: Select “Other” to setup webmail on your iPhone.
Step 3: Now tap on “Add Mail Account” located as the first option to start webmail configuration.
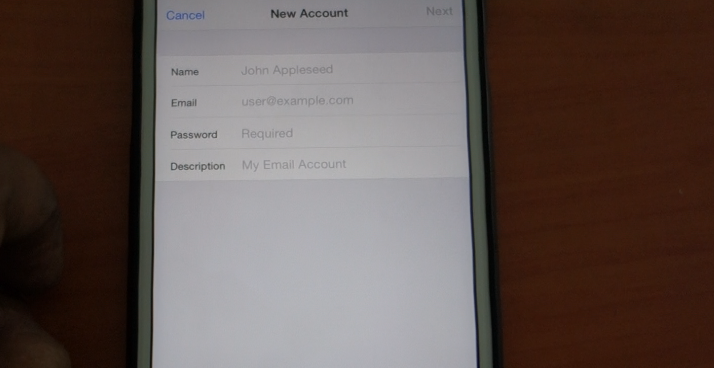
Step 4: Fill out Name, Email, Password and some texts in the Description field and then tap “Next”
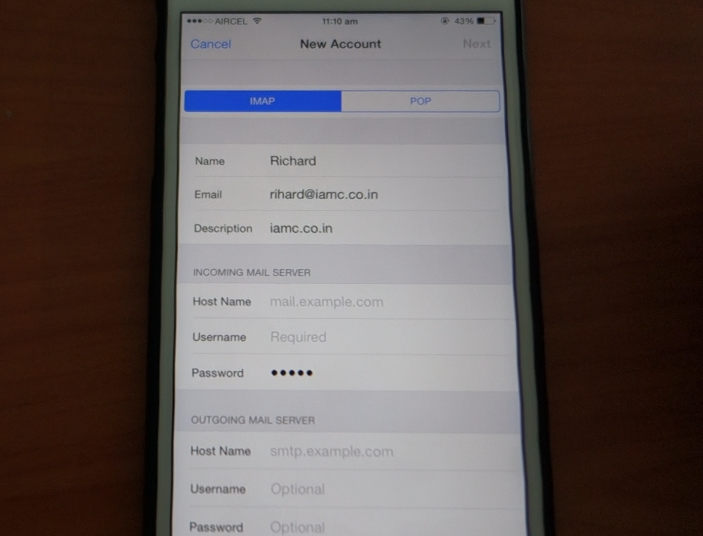
Step 5: You will be entering “New Account” screen. At this page you have to enter your “Incoming Mail Server” and “Outgoing Mail Server” details.
Incoming Mail Server:
Hostname – enter your server IP address where your website is hosted.
Username – enter full email address in this field. Example: [email protected]
Password – enter your password associated for the above mentioned webmail account
Outgoing Mail Server:
fill out the same information given in above “Incoming Mail Server” section. In order to send mails to your contacts, this field is necessary. Dont ignore it as they mentioned them as optional. Once you filled both sections, next comes the important step to successfully setup webmail on iPhone.
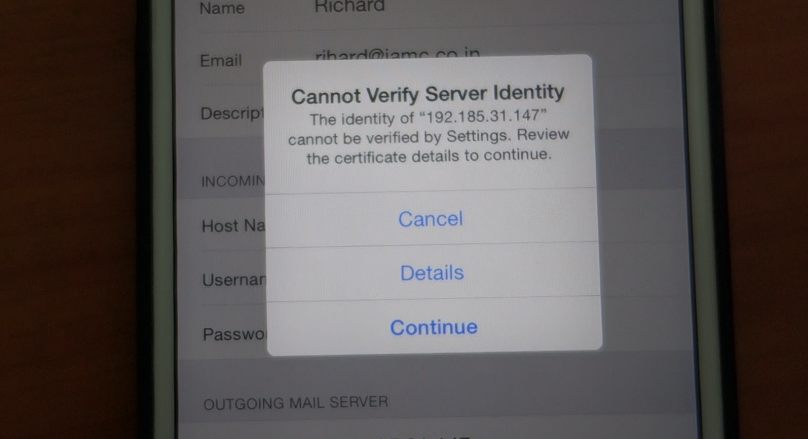
Step 6: After filling out incoming and outgoing mail server details, tap on “Next”. If you dont see any prompt, then you have successfully setup webmail on your iPhone. If you do see a prompt “Cannot Verify Server Identity” as shown in the following picture, then click on “Details”.
Step 7: You will be see the details about Security Certificate of the destination mail server. As we are setting up webmail on iPhone for a hostgator hosted email account, here we see “*.Websitewelcome.com” as certificate domain name and the issuer of the certificate is “RapidSSL CA”. As it says “Not Trusted” in the expiration data, you may verify “more details” if you want to see complete information about the SSL certificate. At the top right corner, you will see a link called “Trust”. Click on that to complete this step.

Step 8: Once you clicked on “Trust” it will take you back to the “New Account” page and the status will be “Verifying” for few seconds. After that, you will see same popup “Cannot Verify Server Identity” and now select “Continue” to complete the webmail setup.
You will see all blue tick marks on the sides of all fields and it will take you to the next screen that asks you what to configure in your iPhone? Mail and Notes. You can choose anyone or both here and click on “Save”.
Congratulations! You have Successfully configured and setup webmail on iPhone running iOS 8 operating system or earlier versions of iOS. Do let me know in the comment box below if you have any questions or doubts. I will be happy to answer that. Thanks for reading and dont forget to give a Tweet about this tutorial if it helped you. Have a wonderful day!

