Android phones are doing bigger than ever magic to their users. This is based on the law of Asimov that machines are those which follows the instructions by the master through their commands. It is always the mentality of human brain in finding a way even if there is a solution for a problem. Running down the stream of cause as stated above, we are going to make a look on making screen-shot and screen-recording for an non-rooted android phone.

- Android Capture Device
Table of Contents
Screen Recording
The valid answer for this should be your usage and your need. Basically for any tech blogger who write articles and develop and execute some android app on their smartphone will be surely in need of the screen casting feature. Which they may also use for some presentations.
Why don’t you root your SmartPhone? rather than following all these steps.
This is purely for those who cannot root their android phone permanently.
Ashot (Android Capture Device) is the application what we are going to see here. Its an open source and also a GNU licensed so any one can use this, develop this and redistribute. This is just a 2.9MB tool also compatible with all the systems. The process might be looking very simple once after you connect your smartphone and start recording your screens.
Follow the instructions below and i’m sure you will be getting better results.
For Windows Environment:
JDK :
The basic thing you need to have on your machine is JDK toolkit if you have this already move on to step 2, else follow the instructions.
you can download Java Developer Kit here…
1. Click Download JDK.
2. Choose Accept License Agreement.
3. Click file which corresponds your platform.
4. Run downloaded exe file and follow onscreen instructions. You may accept all the defaults.
5. It may take several minutes for installer to do its job.

- Java Development Tool Kit
Android SDK
Then you need to get and install Android SDK
1. To get latest Android SDK for Windows platform download here
2. Download installer_r12-windows.exe.
3. Launch downloaded installation package and accept defaults.
4. Click Finish to open SDK Manager.
5. Go to the next section to install USB Driver.
Remember the full path to the SDK for further step for ex: “C:Program FilesAndroidandroid-sdk-windows“.

- Android SDK
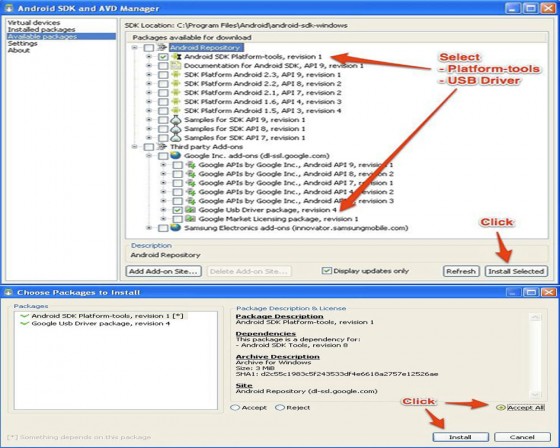
USB Driver & Platform Tools
These are the steps to ensure the connectivity between your Android SDK and the smartphone.
1. Please make sure your phone is NOT CONNECTED to your computer.
2. (Skip this step if you have SDK Manager running already after installation) Run SDK Manager.exe from SDK path. And wait until it has finished refreshing sources.
3. (Only on the first run of SDK Manager) Click Cancel since you don’t need anything but Platform-tools and USB driver for screen capture application.
4. Select Available packages on the left panel.
5. Expand the Android Repository and set check next to Android SDK Platform-tools.
6. Expand Third party Add-ons –> Google Inc. add-ons and set check next to Google USB Driver Package.
7. Click Install Selected.
8. Click Accept All to accept License and then click Install.
9. When install finishes, the USB Driver will be in “C:Program FilesAndroidandroid-sdk-windowsgoogle-usb_driver“.
10. Close SDK Manager.
11. Connect your phone. You will be prompted for driver, which is located in the path mentioned above.
For more information on the installation please visit the link. installation instruction.
- USB Drivers
USB Debugging for Android
To make screen shots on your phone you need to enable USB debugging mode for your device.
1. Click Settings on your phone.
2. Click Applications.
3. Click Development.
4. In that make sure you have enabled USB Debugging.

- USB Debugging
This is all what you have to do for the application to work perfect.
Connecting your Android for capture
Your device is all set to start capturing in seconds ahead.
1. Download latest installation package from SourceForge: https://sourceforge.net/projects/ashot/
2. Run AndroidScreenCapureSetup.vX.X.exe.
3. Follow onscreen instructions.
4. When finished, run application and go to File -> Set Android SDK folder to set SDK path.
So give the SDK path on the browse window and start enjoying taking the screen shots also screen recording.
Here is a sample video for the Screen-shot recording using Nexus.
[youtube width=”550″ height=”344″]http://www.youtube.com/watch?v=c50kXaaHhac[/youtube]
Video Credits: [mightypocket]


a very useful guide for those who dont want to root their Android phone. Appreciable article.
Thanks for sharing @AndroidHogger. Cheers!!!
Having problems. Which Java file am I supposed to use? There are a buch on the webpage. Link to the proper one? Please. I’m running Win 7 64-bit.
Exactly. This post is especially for those who don’t want to root their android. Thanks for sharing with us @471bda4195f518d42d83b6e130bbf72e:disqus
Run the phone on USB Debugging mode and then continue. Thanks for commenting here @2f5cad9a0fc400353586fe49423e7451:disqus and let us know any problems in future.