 Hi! Folks….hope you all had a great weekend and first of all I must say…, Oops I dn’t know what made me to look into the world of open source but it might be the reason our young inspiration Pranav Mistry have rendered the “Sixth sense technology ” to be an open source which turned me upside down to change my views towards open source. Think ,if future innovations in India all focuses towards it then we must have a soft hand towards that platform too.
So people here the stuff comes for you all to make sure that you are going to get immense pleasure on the open source world. Now get learned with the technique to use virtual box rather than using a Boot CD instant for each time of installing an Operating System. Though in certain cases you cant run multiple OS platforms on a single machine which is made possible by virtual box.
Jumping on to the content ,First of all please download the OracleVM Virtual Box software and install it. Then your first guest will be the well-known Ubuntu. Download the 7.04(eg) Desktop edition CD image. When it finishes downloading, open VirtualBox (on GNU/Linux, LD_LIBRARY_PATH=. ./VirtualBox, on Windows, Run VBoxSDL.exe in the folder you compiled it in).
Select the “New” button (or hit Ctrl + N). A “New Machine Wizard” window should pop up (fig 1).

Fig 1: Create New Machine Wizard
Click “Next”. Then, type a name for the virtual machine (I typed Ubuntu). Choose Linux 2.6 (the standard for most modern Linux distros) for the OS type, then hit “Next”. You will be asked how much memory to give. Choose 256MB. For most GNU/Linux distros, you’ll need at least 256MB of RAM to be comfortable (you’ll also need to make sure you have at least 512MB of total physical RAM and have all possible programs closed). Next, you will be confronted with an option to create a hard disk (fig 2).
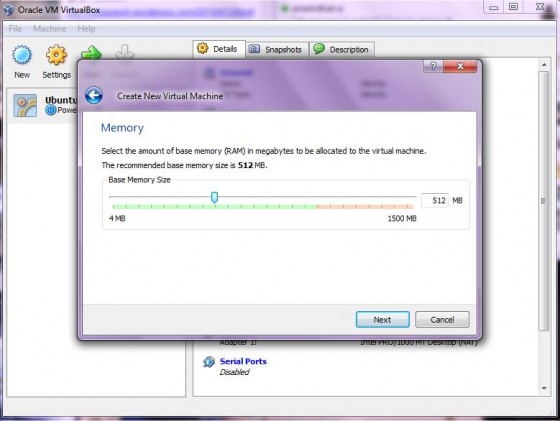
Fig 2: New Virtual Disk Wizard
Click “New”, and yet another window opens. Click “Next”. Now, you have an option to create a dynamically expanding image (hard drive) or fixed-size. Fixed size stays a certain size, while a dynamically expanding one gets bigger or smaller depending on what’s on it. For now, choose dynamically expanding. The next dialog asks you how big you want the hard drive to pretend to be (actual size will vary as mentioned before). Choose 5GB. Next, make sure all details are correct, then click “Finish” to exit the virtual disk wizard. Hit “Next”, confirm everything is correct, then “Finish” to exit the new machine wizard.

Now, click “Ubuntu” once, then click “Settings” (fig 3).

Fig 3: Adding a CD/DVD-Rom
Select “CD/DVD-ROM”. Then, check the “Mount CD/DVD Drive”, select “ISO Image File”, then click the folder icon. The Virtual Disk Manager will pop up. Click “Add”, browse to the place where you saved the Ubuntu file, then highlight it and click “Open”. Now, click “Select” to assign the Ubuntu CD to the Ubuntu virtual machine. You may also want to make sure the “Enable Audio” under the Audio section is checked, so your audio is working.
You are now ready. Click “Okay” and then double-click the “Ubuntu virtual machine”. A new window should launch (figure 4).

Figure 4: The Ubuntu installer
Select “Start or Install Ubuntu”, with the arrow keys, then hit “Enter”. Clicking inside of the window will capture the mouse so you can use it in the virtual machine. To release it hit the right control (Ctrl) key. Wait for Ubuntu to load the desktop. Then, double-click on the “Install” icon. Select a language, then a city, then a keyboard layout, and give some personal info. When you are asked to prepare disk space, choose to erase the whole disk, then hit “Next”. Verify everything is correct, then hit “Install”. Wait for Ubuntu to finish installing (this will take a very long time). Then, restart when it prompts you to.
It will tell you to remove the CD. Click the “Devices” menu at the top of the window, and click “Unmount CD/DVD-ROM”. Then, hit “Enter”. Ubuntu will finish restarting. Now, you are done! You can delete the CD image by taking the following steps: first stop the virtual machine by shutting it down (click the power button in the top right corner in Ubuntu). Then click on the Virtual Disk Manager (“File→Virtual Disk Manager” in the main VirtualBox window), then the CD/DVD Images tab, then click “Release”, then “Remove”. Then, delete the actual CD image.
Now you have successfully completed installing a OS through virtual box. Do enjoy your favorite operating systems under linux or windows platforms now, recently virtual box accepts MAC Operating systems too. So you can think about buying a Mac OS X Disc from Apple Store and install it under your virtual machine. Thinking about torrents ?? 🙂 You can avail that option too.


Awesome Tutorial Arvind .. Thanks this Article was very much informative
Thank you brother. Need your support on future updates too!!!
DSL is great, with ubuntu itself, i found issues with only 256m of ram, it some times hit swap, putting 512meg in that case is highly recommend.
Thanks for commenting justin….!!! I will make a work on it. Cheers!!!
Love it! Keep up the great work.
arvindaaa!!!!!!!!
unless n until i work on it i cant say anything dude………….pls dnt get annoyed…………………..ur explainations helps ppl 2 grasp dude…good work
cheers
minu